Danke Euch Beiden, das sind doch schonmal neue Ansatzpunkte.
Ich bin optimistisch das das zu beheben ist, und wenn nicht ist es jetzt nicht so schlimm da sich ja fast alle CFW´s installieren lassen und lauffähig sind.
Und Esprit mein Guter, Dir kann ich gar nicht oft genug für diese absolut affentittenmegageilen NANDway Doppel-Teensy2++ Modifikationen danken.
D.h. es sind 2 Teensy2++ verbaut mit denen beide NAND Chips der CECHA00 jederzeit neu geflasht werden können, für mich "DER ULTIMATVE CHECHAxx HARDWARE MOD"
Zur Problematik:
Bevor die CECHA00 zu esprit1711 kam war auf der Konsole das QA Flag gesetzt undr eine REBUG 4.30 installiert.
Ich konnte "JEDERZEIT" uber das XMB nach dieser Methode "JEDE FIRMWARE BIS OFW 102" von Festplatte aus installieren ohne jemals eine Fehlermeldung zu bekommen.
Seit dem die Konsole wieder zurück ist kann ich manche Firmware abhängig von der CFW die installiert ist nur über das Recovery Menü aktualiseren und z.t. nur über Disk (z.B. OFW 3.55, 3.15).
Wobei es bei manchen Konstellationen zu einen Brick kommt und ich die NANDs der Konsole neu flashen muss.
Die meisten CFW´s bis 3.55 lassen sich weiterhin untereinander von XMB installieren, manchmal muss ich halt erst auf die REBUG 3.55 von der aus alle CFW´s bis auf die CFW 3.55 OtherOS++/RSOD installiert werden.
Versuche ich die CFW 3.55 OtherOS++/RSOD zu flashen brickt die Konsole.
Ich kämpfe schon einige Tage mit diesem Problem rum und habe die Konsole schon X-mal neu flaschen müssen.
Hat jemand eine Idee woran das liegen künnte, denn meine Vermutung ist das es an der gepatchten ROGERO 3.7 liegt die scheinbar als erstes nach dem Teensy Mod installiert wurde.
PRX Loader v1.06u [Unofficial mod by Joonie] - Adds 4.65 CFW CEX Support
Following the v4.65 update Joonie has made an unofficial update to the very popular plugin loader for non-Cobra cfw's known as PRX Loader. Developed originally by developer user this update marked as v1.06u has provided support for any future 4.65 CEX CFW's releases.
-STLcardsWS
Download: PRX_LOADER_1.06[U] ( Mirror: Brewology ) SRC CODE: link
Inhalte von externen Seiten werden ohne Ihre Zustimmung nicht automatisch geladen und angezeigt.
Durch die Aktivierung der externen Inhalte erklären Sie sich damit einverstanden, dass personenbezogene Daten an Drittplattformen übermittelt werden. Mehr Informationen dazu haben wir in unserer Datenschutzerklärung zur Verfügung gestellt.
For those who may not already know, our relentless developers finally managed to piece together the puzzle, and have some proof (yes, solid evidence) that the 'race attack' as described by fail0verflow is nearing completion. This portion of the overall 'hack' is far from finished, but is close enough to the point where it's time to branch off and begin working on the Linux portion of the over-encompassing project.
At this time, ONLY 2GB SD CARDS ARE KNOWN TO WORK. You are more than welcome to try with an SDHC card of larger size, but don't cry when it doesn't work. Though, you never know, it might work!
For the manual installation, you can extract the above archive, then the trinux_0.5.7z file inside of it, and write it to your SD card using one of the many available programs. 'dd' if you're cool, or if you prefer GUI, Win32DiskImager (sourceforge), This SD image is broken up into three sections.
fat16 partition to store our app, you can place others in the sd:/apps/ folder if you'd like. ext3 Linux filesystem Linux swap space (not activated at this time)
After writing the image to your SD, you will only see partition 1. Windows is incapable of reading ext3 partitions. If you are lucky enough to successfully log in, you can try activating the swap space by typing:
ls /dev/mmcblk* (since the swap space is on the last partition of this device, make note of this, it will probably be /dev/mmcblk0p3 to activate type: swapon /dev/mmcblk0p3 If that succeeds, let me know and I'll issue a patch that will automount the swap partition on bootup.
I RECOMMEND MANUALLY WRITING THE IMAGE TO YOUR SD CARD.
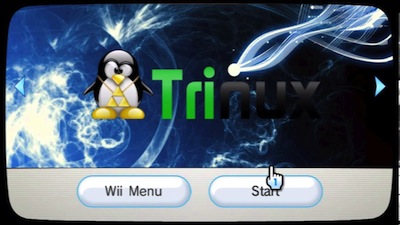
GBAtemp member TeamScriptKiddies has posted a video that shows Ubuntu working on vWii for the Wii U. He states that he is mainly a tester for the main developer Ninja_Carver.
Their combined efforts have LXDE successfully running on Ubuntu 12.04. with internet working as well.
Here is the quote from TeamScriptKiddies -
Instructions Launch this on your vWii using HBC, click the Trinux launcher and watch the magic happen .
When you're on the Trinux LXDE GUI Desktop hold down CTRL+ALT+F1 to switch to the terminal then type these instructions to activate the swapfile to serve as virtual memory:
That disk image already has a swap partition.
swapon /dev/mmcblk0p3
Hit CTRL+ALT+F7 to switch back to the GUI once you're done.
You are going to want to use this otherwise things will run as slow as molasses and will eventually crawl to a halt as the vWii has very limited ram, which is all we have access to at the moment. Likely this won't change until this get ported over to full Wii U mode, instead of this altered vWii state. To port this over we will need a full blown exploit for Wii U mode first.
In this release you will also need to manually activate the internet. Make sure you are using a Wii/Wii U compatible LAN adapter to connect to the internet and you have this set as your default connection in the Wii U settings. Once you've booted into Trinux and you're on the LXDE desktop hit CTRL+ALT+F1 to switch to the terminal then type (YOU WILL NEED ROOT ACCESS TO DO THIS, either login as root-not the safest bet or use the sudo su command to temporarily gain root access):
dhclient eth0 and hit 'enter'
if all goes well, it will just jump to the next line where you can type another command, no output is given in this release, not sure what's going on with this.
Hit CTRL+ALT+F7 to switch back to the GUI once you're done.
Open Mozilla Firefox to make sure your connection is working, enjoy .
Logins for this beta are as follows:
User: tsk pass: trinux
User: Root pass: trinux
IT'S HIGHLY RECOMMENDED THAT YOU CHANGE THESE IMMEDIATELY IF YOU WANT ANY SENSE OF SECURITY, THESE ARE ONLY INTENDED TO BE DEFAULT LOGINS! IF YOU'RE TOO LAZY TO CHANGE BOTH LOGINS OR ADD ANY NEW ONES, AT THE VERY LEAST CHANGE ROOT AS IT IS SUPER USER UNLESS YOU WANT SOMEONE ELSE TO HAVE THE ABILITY TO TRASH YOUR LINUX SETUP.
You will notice another default user called "USB Mux Daemon" this is NOT working! Just disregard it altogether at this time.
This WILL NOT run on an original Wii using the trinux launcher
Inhalte von externen Seiten werden ohne Ihre Zustimmung nicht automatisch geladen und angezeigt.
Durch die Aktivierung der externen Inhalte erklären Sie sich damit einverstanden, dass personenbezogene Daten an Drittplattformen übermittelt werden. Mehr Informationen dazu haben wir in unserer Datenschutzerklärung zur Verfügung gestellt.
Diese Seite verwendet Cookies. Durch die Nutzung unserer Seite erklären Sie sich damit einverstanden, dass wir Cookies setzen.Weitere InformationenSchließen