


REBUG EDITIONS CEX/REX/D-REX
4.21.x - 4.75.x & 999 DOWNGRADER
# UPDATE: 13. Januar 2015
Beim Updaten/Downgraden darf sich
KEINE DISK IM LAUFWERK BEFINDEN !!!
SUPPORTTHREAD: REBUG CFW Edition`s (klick)
VORWORT
FÜR ALLE DIE MIT DER INSTALLATION EINER FIRMWARE ODER SONSTIGEN MANIPULATIONEN AN DER PS3 NICHT VERTRAUT SIND.
BEI FIRMWARE/HOMEBREW INSTALLATIONEN BETEHT IMMER DAS RISIKO DAS DIE KONSOLE BRICKT.
ACHTET BEI ALLEN IMMER DARAUF WAS/WIE IHR AUF EURER PS3 INSTALLIERT UND HALTET EUCH EXAKT AN DIE TUTORIALS/ANLEITUNGEN
WICHTIG: DIE REBUG REX EDITION CFW´s 3.55.x bis 4.65.x CEX/REX SIND NUR BIS FIRMWARE 3.55 INSTALLIERBAR.
KONSOLEN DIE AB WERK ÜBER FIRMWARE 3.55 AUSGELIEFERT WURDEN UND DOWNGRADEFÄHIG SIND MÜSSTEN EINEN HARDWAREDOWNGRADE ERHALTEN.
BEI HARDWAREDOWNGRADETEN PS3´s MUSS DER SYSCON CHIP RESETET WERDEN !!!
(DURCH INSTALLATION EINER FIRMWARE 3.41/3.55 ÜBER DAS RECOVERY MENÜ)
DAZU KÖNNTET IHR AUCH ToggleQA INSTALLIEREN, DIE SYSTEM UPDATE DEBUG AUF ON STELLEN UND PER RECOVERY MENÜ EINE OFW 3.41/3.55 INSTALLIEREN.
WICHTGER HINWEIS : WIR RATEN DRINGENDS DAZU ToggleQA GRUNDSÄTZLICH ZU INSTALLIEREN !!!
SOMIT WÄRE DER SYSCON CHIP AUCH ZURÜCKGESETZT UND DIE INSTALLATION EINER REBUG REX EDITION KANN BEGINNEN.
MIT EINER REBUG REX EDITION KÖNNEN ZUR ZEIT ALLE SPIELE OHNE GEPATCHTE EBOOTS ABGESPIELT WERDEN.
VIDEO
DEUTSCHES VIDEO REVIEW REBUG DEX
INSTALLATION
REBUG 4.21.x bis 4.65.x REX EDITIONS
INSTALLIEREN:
Auf einer QA geflagten PS3 kann aus dem XMB die REBUG 4.21.x bis 4.65.x REX EDITION über jede 3.55 OFW/CFW/MFW oder REBUG REBUG 4.21.x bis 4.65.x REX oder niedrigeren Firmware installiert werden
DEINSTALLIEREN:
Von einer QA geflagten PS3 kann aus dem XMB die REBUG 4.21.x bis 4.65.x REX EDITION mit der Gleichen oder höheren OFW/CFW/MFW oder mit REBUG 3.55.x REX EDITION deinstalliert werden.
Nicht QA geflagte PS3 können mit dem `999` DOWNGRADER gedowngradet werden.
REBUG 3.55.x REX EDITION
INSTALLIEREN:
Auf einer QA geflagten PS3 kann aus dem XMB die REBUG 3.55.x REX EDITION
über die Gleiche oder höhere OFW/CFW/MFW installiert werden
DEINSTALLIEREN:
Von einer QA geflagten PS3 kann aus dem XMB die REBUG 3.55.x REX EDITION mit der Gleichen oder höheren OFW/CFW/MFW deinstalliert werden.
Nicht QA geflagte Konsolen können mit dem `999` DOWNGRADER gedowngradet werden.
REBUG `999` DOWNGRADER
DER DOWNGRADE SETZT SYSCON COREOS AUF VERSION 9.99: KEINE PANIK !!!
BENÖTGT DEHASH/SYSCON RESET NACH DEM DOWNGRADE
(z.B. OFW 3.41 INSTALLIEREN = DEHASH/SYSCON RESET)
INSTALLIEREN:
Aus dem XMB einer QA geflagten/ungeflagten PS3 den `999` DOWNGRADER über jede CFW/MFW installieren
DEINSTALLIEREN/DEHASHEN: PS3 MUSS QA GEFLAGT SEIN !!!
Aus dem XMB wird der`999` DOWNGRADER mit der REBUG 3.55.x REX EDITION
oder aus dem Recovery Mode mit jeder anderen 3.55 OFW/CFW/MFW deinstalliert/dehashed.
FUNKTIONEN
REBUG REX EDITION FEATURES/UPDATED
- Dual LV2 Kernels CEX/DEX
- EID0/LV2 kernel mit Rebug Toolbox umschalten)
- ALLE Retail Funktionen im CEX MODE
(Keine andere Firmware notwendig !!!)
– ALLE Debug Funktionen im DEX MODE
(Keine andere Firmware notwendig !!!)
– ProDG Connectivität im DEX MODE
– QA Token kompatibel
– OtherOS++ Unterstützung möglich
(REBUG TOOLBOX bootet OtherOS mit unterschiedlichen LV1 Patches)
REBUG CEX EDITION FEATURES/BASICS
– OtherOS++ Unterstützung möglich
(REBUG TOOLBOX bootet OtherOS mit unterschiedlichen LV1 Patches)
- 4.66 Spoof Dateien
(Ermöglicht PSN/SEN auf REBUG 4.21.x REX - 4.65.x CEX/REX)
- Package Manager
(Ersetzt die Standard "Install Package Files" Option)
- REBUG TOOLBOX 02.xx.xx
(Beinhaltet REBUG TOOLBOX die von Festplatte installierbar ist)
REBUG REX EDITION FEATURES/PATCHED
– LV1: Disable System Integrity Check
(Sicher bei fehlerhaften COREOS/SYSCON od. nicht QA geflagte Konsolen)
- LV1: Undokumentierte Funktion 114
(Erlaubt Abbildung von geschütztem Speicher)
- LV1: Überspringt alle ACL Prüfungen
(OtherOS muss erlaubt sein)
– LV1: Peek and Poke support
(Unbenutzter LV1 call 182 und 183)
- LV2: Peek and Poke support
(LV2 Syscall 6 und 7)
- LV2: Peek and Poke support for LV1
(LV2 Syscall 8 und 9)
- LV2: LV1 CALL System call
(LV2 Syscall 10)
REBUG REX EDITION FEATURES/FUN
- VSH: aktiviert Ausführen unsignierter act.dat and *.rif Dateien
- VSH: deaktiviert Trennen/Löschen von act.dat Dateien
– Fake Save Data Owner in CEX/DEX Mode
(Game Saves von JEDEM BESITZER nutzen !!!)
– Sichern/Entsichern von Trophies im CEX/DEX Mode
– Cinavia Schutz im CEX/DEX Mode ausschalten
PACKAGE MANAGER
Der Package Manager ist ein Ersatz für die Standard Install Package Files Option
im XMB bei der Nutzung einer CFW/JIG Dongles.
Er ermöglicht die Installation/Löschung von .pkg Dateien auf dev_hdd0/packages,
dev_usb/packages und anderen Orten für Standard Install Package Dateien.
Darüber hinaus werden PSN Download Inhalte "bubble" in dieser Option angezeigt
anstatt damit das Spielmenü zu überladen.
BENUTZUNG
Ins XMB navigieren (wo gewöhnlich die Install Package File Option ist), dort sind drei Optionen auswählbar.
PlayStation®Network Content
Verwaltet heruntergeladene PlayStation®Network Inhalte.
Install Package Files
INSTALLIERT Package Dateien von beliebigen Orten (USB Speichergerät und/oder PS3)
- PS3 Hard Disk (dev_hdd0/packages)
- Package Verzeichniss (dev_usb/packages)
- Standard Package Location (Standard Orte für Install Package Dateien)
HINWEIS: Die Option INSTALL ALL PACKAGES kann nur durch drücken der Dreieckstaste ausgewählt werden wenn sie vorher markiert wurden.
Dann werden alle .pkg Dateien auf aus dem Rootverzeichniss des USB Speichermediums installiert.
Delete Package Files
LÖSCHT Package Dateien vom Speichergerät oder der PS3
- PS3 Hard Disk (dev_hdd0/packages)
- Package Verzeichniss (dev_usb/packages)
- Standard Package Location (Standard Orte für Install Package Dateien)
DATEIEN LÖSCHEN:
1: Die gewünschte .pkg Datei markieren & die [COLOR=silver
]DREIECKSTASTE[/COLOR] drücken (Seitenleiste erscheint)
2: Unlink or Unlink (Folder) anwählen und KREUZ drücken
REBUG TOOLBOX
Die Rebug Toolbox ist die neue Schaltzentrale um die Funktionsvielfallt der Rebug REX Firmware voll auszuschöpfen.
Neben dem dem Umschalten des CEX/DEX EID0 Rootkey und dem LV2 Kern beinhaltet die Rebug Toolbox neben einem
FTP Server eine Menge anderer nützlicher Werkzeuge.
INSTALLATION:
1: Im PS3 XMB Game Menu navigieren
2: Package Manager auswählen
3: Install Package Files auswählen
4: PS3 Hard Disk auswählen
5: REBUG-TOOLBOX-02.00.00.pkg installieren
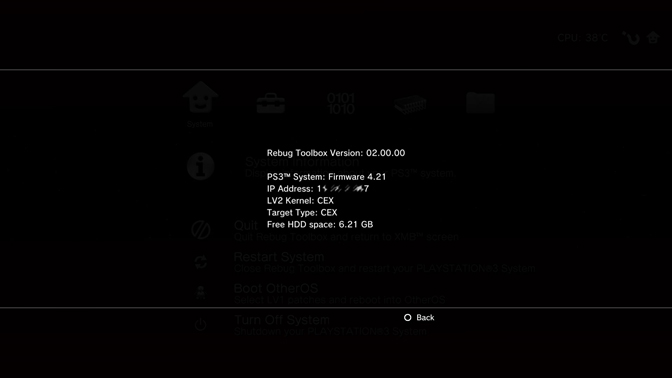
SYSTEM
SYSTEM INFORMATIONEN:
Zeigt Informationen zur Firmware/Toolbox Version, IP Adresse, aktuell geschalteten LV2 Kern , Target Adresse und Freien Platz auf der Festplatte an.
QUIT:
Beendet die Rebug Toolbox und kehrt zurück ins PS3 XMB.
RESTART SYSTEM:
Führt entweder einen Full oder Soft Reboot des PS3 Systems aus
- Soft (LV2 Reboot Only)
- Full (On/Off Cycle)
Boot OtherOS:
Startet OtherOS entweder mit den aktuellen ausgewählten LV1 Patches oder einfach ALLEN LV1 Patches
- Boot (LV1 Patches: Apply All)
- Boot (LV1 Patches: Use current)
Turn Off System:
Schaltet PS3 aus.
SELECTOR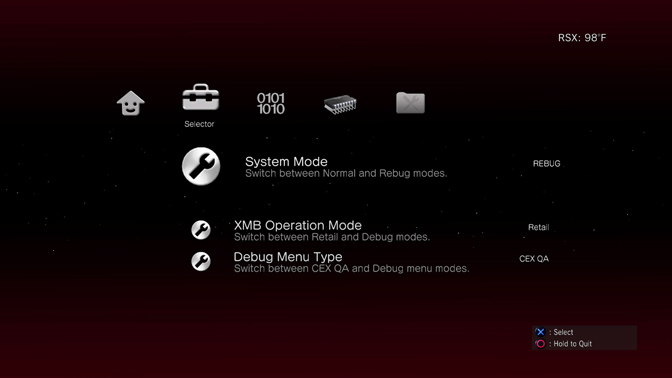
SYSTEM MODE:
Schaltet zwischen NORMAL und REBUG Mode
NORMAL MODE nutzt die DEBUG XMB und ist nach der Rebug DEX Installation voreingestellt.
REBUG MODE schaltet die PS3 auf eine aktuellen Spoofer (zukünftig updatebar) und ermöglicht das Umschalten zwischen RETAIL & DEBUG XMB
XMB OPERATION MODE:
Diese Option funktioniert nur im DEBUG Mode und lässt entweder zwischen RETAIL oder DEBUG XMB auswählen.
DEBUG MENU TYPE:
Lässt CEX QA (Retail) oder DEX (Debug) Debug Settings Menu auswählen
LV1 PATCHES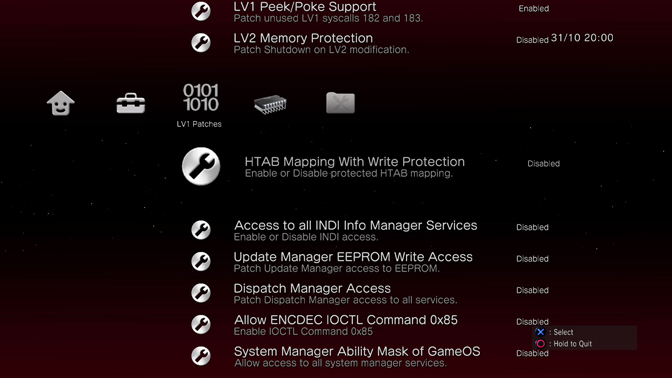
Beinhaltet eine Auswahl von LV1 Patches für bessere Kompatibilität mancher PS3
Tools.
Jede Kombination dieser Patches kann vor dem Start von OtherOS hinzugefügt
werden.
DEX/CEX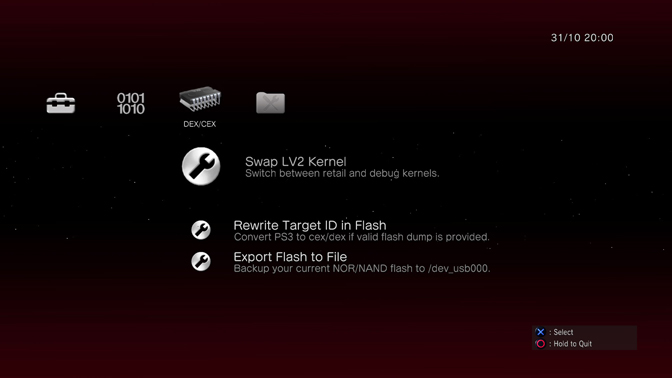
SWAP LV2 KERNEL:
Schaltet zwischen CEX & DEX LV2 Kernel um, funktioniert nur wenn die Target ID der Konsole auf DEX geflasht wurde.
REWRITE TARGET ID IN FLASH:
Für diese Option wird ein *korrekt benannter gültiger NOR/NAND Dump auf einem USB Speichermedium in dev_usb000 benötigt.
EXPORT FLASH TO FILE: Funktion zum Dumpen eines NOR/NAND Dumps auf ein USB Speichermedium in dev_usb000 benutzen.
Mit cex2dex.exe, diesem Dump und dem EID0 Rootkey dieser Konsole einen konvertierten DEX Dump erstellen
Die Dumps umbenennen (Wichtig, auf Schreibweise achten !!!)
Original CEX Dump in CEX-FLASH.EID0.NORBIN (16mb) oder CEX-FLASH.EID0.NANDBIN (239mb oder 256mb)
Konvertierte DEX Dump in DEX-FLASH.EID0.NORBIN (16mb) oder DEX-FLASH.EID0.NANDBIN (239mb or 256mb)
Die beiden Dumps auf ein USB Speichermedium kopieren und in den rechten USB Port der PS3 dev_usb000 einstecken.
Nun nachdem die beiden gültigen Dumps auf dem USB Speichermedium vorhanden sind einfach den Anweisungen folgen.
Wenn die richtig erstellten/konvertierten Dumps auf dem USB Speichermedium vorhanden sind dauert das umschalten weniger als 10 Sekunden.
EXPORT FLASH TO FILE:
Erstellt eine Backupdatei des aktuellen NOR/NAND aufUSB Speichermedium in
dev_usb000.
Ein NAND Dump (256MB dauert ca. 45Sek)
UTILITIES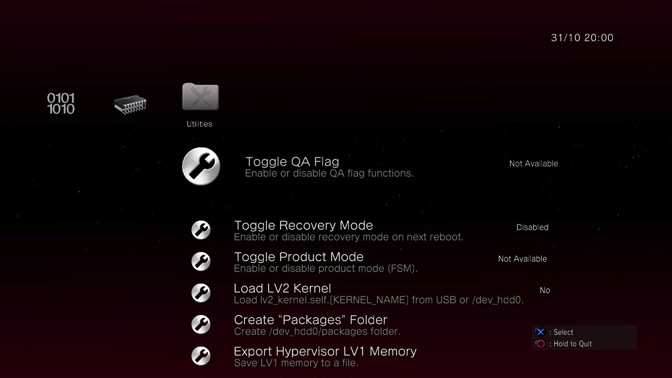
TOGGLE QA:
Schaltet QA Flag AN/AUS. Funktioniert nur REBUG 3.55.3 REX EDITION da wir auf höheren Firmware zur Zeit noch kein QA Flag setzen können.
TOGGLE RECOVERY MODE:
Schaltet Recovery Mode Flag AN/AUS. Ist das Flag gesetzt rebootet die Konsole in den Recovery Mode.
TOGGLE PRODUCT MODE:
Schaltete Product Mode Flag AN/AUS. Ist das Flag gesetzt rebootet die Konsole inden Factory Service Mode.
Aus Sichheitsgründen kann das Flag nur auf REBUG 3.55.3 REX EDITION gesetzt werden.
LOAD LV2 KERNEL:
Lädt lv2_kernel.self.[KERNEL_NAME] von USB oder /dev_hdd0
CREATE PACKAGES FOLDER ON PS3:
Erstellt /dev_hdd0/packages Verzeichniss auf der Festplatte der PS3 für denPackage Manager.
EXPORT HYPERVISOR LV1 MEMORY:
Speichert LV1 Memory nach dev_usb000 bis dev_usb006 oder dev_hdd0 wenn kein USB Speichermedium gefunden werden konnte
EXPORT HYPERVISOR LV2 MEMORY:
Speichert LV2 Memory nach dev_usb000 bis dev_usb006 oder dev_hdd0 wenn kein USB Speichermedium gefunden werden konnte
CHANGE ACTIVE PS3ID:
Spoof IDPS in LV2 memory. Choose from a list of Target ID’s or Use EID5 which will spoof your original CEX IDPS allowing you to connect to PSN if your PS3 is
running REBUG 4.65.x REX EDITION in DEX mode.
OTHER TOOLBOX FEATURES:
- L3 wechselt Zeit/Temperatur Anzeige
- L2+R2 schaltet Bildschirmschoner
- START+R2 macht ein RAW RGB Bildschirmfoto
- Remote-Play via PSP/PSVITA
- Automatisch-Abschalten nach einer Stunde ohne Aktion
- Telnet zur PS3 ip at port: 8080
- FTP Zugriff mit beschreibbaren dev_flash gemounted als dev_rebug
(port: 21, user: anonymous, password: (anything))
QA-FLAG
WICHTIGE INFORMATION ZUM QA SUPPORT
Die QA-Flag Funktion wird nun in ALLEN REBUG REX EDITIONS komplett unterstützt.
Es hat sich bewährt das QA-FLAG GRUNDSÄTZLICH ZU SETZEN,nicht nur bei der Installation einer REBUG REX EDITION.
OTHEROS++
OTHEROS++ SUPPORT
Alle REBUG REX EDITIONS unterstützen OtherOS++ und erkennen vorhandene OtherOS++ Festplatten Partitionen.
Keine REBUG REX EDITIONS hat das emer_init.self Package patched (erstellt kleinere GameOS Partition).
Es wird an einer Lösung gearbeitet das aus dem GameOS heraus zu machen.
In der Zwischenzeit gibt es zwei andere Möglichkeiten eine OtherOS Partition zu erstellen:
1: 3.55 Firmware nutzen welche die emer_init.self Package zu der gewünschten
Grösse patched hat.
2: REBUG 3.55.3 REX EDITION mit dem PS3MFW Builder selbst patchen.
Wird Option 2 ausgweählt wird dringend geraten NUR die emer_init.self zu patchen.
Ausserdem kann die PS3MFW Builder gepatchte PUP nur auf 3.55 installiert werden da spkg_hdr nicht mehr übereinstimmt
OtherOS auf REBUG REX EDITION 4.21.1 läuft im Moment noch sehr eingeschränkt, da der Speicher nicht zuordenet werden kann wie in Firmware 3.55 und darunter.
Die betroffenen Module sind ps3ram und ps3sbmmio, es wird gehofft eine Lösung zu finden ohne eine neue Firmware veröffentlichen zu müssen.
DEBUG OPTIONEN
ZitatAlles anzeigenOriginal von PS3DevWiki.com
Debug Settings: MENU 2 (DEX)
•0 Button Behavior:
Switch the assignment of the “O” button to “X” button (like for japans games/region settings).
“Enter” : assign the “Enter” function to “O” button
“Back” : assign the “Enter” function to “X” button.
•NP Environment:
Edit the environment variable to connect to the network of your choice.
Examples:
“np” : retail network.
“sp-int” : developers network.
“prod-qa” : production quality assurance network.
Note : There are other networks than debugs can access but only QA flagged consoles can connect to them (mgmt, rc, etc…)
•Game Type (Debugger):
Set the game type of an application when this one is started from the debugger (usually, this information is read from PARAM.SFO).
“Disc Boot Game” : use application like a game disc.
“HDD Boot Game” : use application like a HDD boot game.
“Patch” : use application installed as a game patch.
“PARAM.SFO” : use the param.sfo directly from the application.
•Game Output Resolution (Debugger):
Set the game output resolution of an application when this one is started from the debugger (usually, this information is read from PARAM.SFO).
“480 (4:3)”
“480 (16:9)”
“576 (4:3)”
“576 (16:9)”
“720
“960 x 1080
“1280 x 1080
“1440 x 1080
“1600 x 1080
“1920 x 1080
•Game Output Sound (Debugger):
Set game output sound of an application when this one is started from the debugger (usually, this information is read from PARAM.SFO).
“Maximum Number of Channels Set on [ Sound Settings ] > [ Audio Output Settings ]“
“2 ch”
“2 ch (Downmix: 5.1 ch -> 2 ch)”
“2 ch (Downmix: 7.1 ch -> 2 ch)”
“5.1 ch”
“5.1 ch (Downmix: 7.1 ch -> 5.1 ch)”
“7.1 ch”
“Dolby Digital”
“Dolby Digital (Downmix: 7.1 ch -> 5.1 ch)”
“DTS”
“DTS (Downmix: 7.1 ch -> 5.1 ch)”
•BGM Player (Debugger):
Set the activation of BGM playback when an application is started from the debugger (usually, this information is read from PARAM.SFO).
“Off” : deactivate the BGM Player.
“On” : activate the BGM Player.
•GameContentUtil Boot Path (Debugger):
Change the game content boot path when an application is started from the debugger.
“For Development” : return the real path where the application is started.
“For Release” : return the path from “GameContentUtil dirName (Debugger)” setting
•GameContentUtil dirName (Debugger):
Change the game content directory when an application is started from the debugger in release mode.
•GameContentUtil Boot Path (/app_home/PS3_GAME/):
Change the game content boot path when an application is started from /app_home/PS3_GAME/.
“For Development” : return the real path where the application is started.
“For Release” : return the path from the PARAM.SFO settings.
•Region Settings:
Change the console settings (system language, time, date, etc…) depending on which region are selected.
“Japan”
“North America”
“Oceania”
“UK”
“Europe”
“Korea”
“Southeast Asia”
“Taiwan”
“Russia”
“China”
“Mexico”
“Hong Kong”
•Fake Other Region:
Fake the license area of the console (“SCEE” for Europe, “SCEA” for America, etc…) to “Other”.
“Off” : the Fake Other Region setting is deactivated.
“On” : the license area is set to “Other”.
Note : Setting on that option is not saved after a console reboot.
•HDCP:
High-bandwidth Digital Content Protection (HDCP) is a form of digital copy protection developed by Intel Corporation to prevent copying of digital audio and video content as it travels across High-Definition Multimedia Interface (HDMI) connection. (http://en.wikipedia.org/wiki/HDCP)
“Off” : the HDCP protection is deactivated.
“On” : the HDCP protection is activated
•Display HDD Free Space:
Display the hard drive free space on the menu screen while an application is running
•Fake Free Space:
Fake the amount of free space on the HDD, in “Fake Limit Size” function.
“Off” : deactivate Fake Free Space function.
“On” : activate Fake Free Space function.
“On (Ignored in NP Trophy)” : activate Fake Free Space function exept for trophy functions.
•Fake Limit Size:
Set the amount of free space on the HDD in MB when the “Fake Free Space” function is activated.
•Fake Save Data Owner:
Allows use of save data from other users and displays a warning message at every load/save during the game. Once a save data has been saved with this features activated, that save couldn’t be read with this function deactivated.
“Off” : deactivate the Fake Save Data Owner function.
“On” : activate the Fake Save Data Owner function.
•Format System Cache:
Format the system cache area.
“Yes” : format the system cache.
“No” : cancel the system cache format.
•Release Check Mode:
Check if /app_home is used in the application.
“Development Mode” : the application can used /app_home.
“Release Mode” : the application can’t use /app_home.
•Exception Handler:
Handle PPU exceptions in order to debug an application.
“Off” : deactivate the exception handling.
“On” : activate the exception handling.
•NP Debug:
When an application is started, Playstation Network information related to that application is displayed.
“Off” : deactivate the NP Debug function.
“On” : activate the NP Debug function.
•NPDRM Debug:
Set and test the access rights to an application that use drm protection.
“Off” : deactivate the NPDRM Debug function.
“No Entitlement (80029513)” : return 80029513 error.
“Deactivated (80029514)” : return 80029514 error.
“Unexpected Error” : return unexpected error.
•NPDRM Clock Debug:
Activate/deactivate the validity period of an application that use drm protection.
“Off” : deactivate the NPDRM Clock Debug function.
“On” : activate the NPDRM Clock Debug function.
•Service ID:
Edit the Service ID of the content to access it on the Store.
Example : AB0000-ABCD12345_00
•MsgDialogUtil Display Errorcode:
Display the error code of an application that uses the cellMsgDialogOpenErrorCode function in the notification window.
“Off” : deactivate the MsgDialogUtil Display Errorcode function.
“On” : activate the MsgDialogUtil Display Errorcode function.
•Format BD Emulator HDD:
Format the external usb device (FAT32) for use it with the BD Emulator Function.
“Quick Format” : Make a quick device format.
“Full Format” : Make a full device format.
•Disable ExitGame Timeout:
Disable the forced termination of an application due to a time out.
“Off” : do not disable the ExitGame Timeout function.
“On” : disable the ExitGame Timeout function.
•Core Dump:
The Core Dump functions save and configure the output exceptions of applications in order to debug them.
“Copy” : Copy a core file.
“Delete” : Delete a core file.
“Option” :
[Option] > [Trigger Option]
“Disable PPU exception detection” : PPU exception are not includes in the core file.
“Disable SPU exception detection” : SPU exception are not includes in the core file.
“Disable RSX® exception detection” : RSX exception are not includes in the core file.
“Disable Foot Switch detection” : the foot switch detection is deactivated.
[Corefile Generation Option]
“Disable Memory Dump” : the memory dump is not include in the core file.
[Execution Control Option]
“Enable restart process and core dump function after core dumped” : After a core file dumped, the process will restart and the core dump function activated.
“Off” : deactivate the core dump function.
“On (Save to /app_home)” : activate the core dump function and save the core file to /app_home.
“On (Save to /dev_ms)” : activate the core dump function and save the core file to /dev_ms.
“On (Save to /dev_usb)” : activate the core dump function and save the core file to /dev_usb.
“On (Save to /dev_hdd0)” : activate the core dump function and save the core file to /dev_hdd0.
•Crash Report:
When the console crashes, a report can be sent to Sony servers.
“Off” : deactivate the Crash Report function.
“On” : activate the Crash Report function.
•PowerOnReset:
The console is automatically turned on when the main power button is turned on.
“Off” : deactivate the PowerOnReset function.
“On” : activate the PowerOnReset function.
•Boot Mode:
Choose which mode to boot the console.
“Debugger Mode” : boot on the debugger, for debugging purpose.
“System Software Mode” : boot on system software mode, for developing purpose.
“Release Mode” : boot on release mode, the same than retail console, for finals tests purpose.
•Blu-ray Disc Access:
Choose the Blu-ray disc type of access.
“BD Emulator (DEV)” : Use the internal hdd for the BD-Emulator. (Reference Tools only)
“BD Emulator (USB)” : use an usb hdd formatted for the BD-Emulator.
“BD Drive” : use the Blu-Ray Disc drive.
•Transfer Rate Pacing for BD Emulator:
When the BD Emulator function is activated, the transfer rate can be choose between two options.
“HDD Native” : maximum transfer rate.
“Equiv. to BD Drive” : same transfer rate than the BD Drive.
•Network Settings for Debug:
Choose different network settings for the debugging than the settings used in usual settings.
“Single Settings” : use the same network settings for debugging than settings used in [Settings] > [Network Settings].
“Dual Settings” : use two different network settings.
•Connection Status List for Debug:
Show the network information for the debugging.
•Connection Settings for Debug (Dual Settings):
Choose network settings for the debugging.
Note : the “Network Settings for Debug” function have to be set on “Dual Settings”.
•Pad Auto Detect:
This function allows the console to automatically detect a paddle connected by USB.
“Off” : deactivate the Pad Auto Detect function.
“On” : activate the Pad Auto Detect function.
•Initialize Boot Parameters:
Reset boot parameters to their default value.
“Yes” : reset boot parameters.
“No” : do not reset boot parameters.
•Update Server URL:
Choose the server of firmware updates when selecting [Settings] > [System Update].
Example : http://www.myexampleserver.com/ps3updat.txt
Ps3updat.txt example :
Dest=82;ImageVersion=FFFFFFFF;SystemVersion=1.0000;CDN_Timeout=30;CDN=http://www.myexampleserver.com/PS3UPDAT.PUP.100.001;
Dest=82;ImageVersion=FFFFFFFF;SystemVersion=2.0000;CDN_Timeout=30;CDN=http://www.myexampleserver.com/PS3UPDAT.PUP.200.001;
•Video Upload Debug:
When a video is uploaded on YouTube with the video upload function, the uploaded video is set to private.
“Off” : the Video Upload Debug function is deactivated.
“On” : the Video Upload Debug function is activated.
•Wake On LAN:
Wake-on-LAN is an Ethernet computer networking standard that allows a computer to be turned on or woken up by a network message. The message is usually sent by a program executed on another computer on the same local area network. (http://en.wikipedia.org/wiki/Wake-on-LAN)
“Off” : deactivate the Wake On Lan function.
“On” : activate the Wake On Lan function, the console can be turned on by a network message.
•PlayStation ®Store Ad Clock:
Change the clock time of the ★ Title Store Preview (Store).
“Off” : the PlayStation ®Store Ad Clock function is deactivated.
“On” : the PlayStation ®Store Ad Clock function is activated.
•Dummy XMB™ (in game) Debug:
This function checks how applications react while the XMB™ in game is used. If the resources debits are not enough, a message will be display in the notification window.
“Off” : the Dummy XMB™ (in game) Debug function is deactivated.
“On” : the Dummy XMB™ (in game) Debug function is activated.
•Dummy BGM Player Debug:
This function checks how applications react while the BGM Player is used. If the resources debits are not enough, a message will be display in the notification window.
“Off” : the Dummy BGM Player Debug function is deactivated.
“On” : the Dummy BGM Player) Debug function is activated.
•GameUpdate Impose Test:
The application will find a fake patch in order to test how the application will react when a patch is found.
“Off” : deactivate the GameUpdate Impose Test function.
“On” : activate the GameUpdate Impose Test function.
•Network Emulation Setting:'
Emulate the network in order to test how the application will react with networks troubles.
“Off” : the Network Emulation Setting function is deactivated.
“Option 1 : the Network Emulation Setting function is activated (packet delay time : 100ms).
“Option 2 : the Network Emulation Setting function is activated (bandwitch limitation : 132072 bps).
“Option 3 : the Network Emulation Setting function is activated (send packet loss : 5%).
•Network Emulation Status:
Show information of the Network Emulation Setting function. This information is also showed when selecting an option in Network Emulation Setting function.
•MediatedServices: Mediator URL:
Set the mediator URL of Mediated Services.
•MediatedServices: Provider Data:
Set the provider data of Mediated Services.
•MediatedServices: Notifications:
Activate/deactivate the Mediated Services notifications.
“Off” : the MediatedServices Notifications function is deactivated.
“On” : the MediatedServices Notifications function is activated.
•WLAN Device:
Activate/deactivate the wireless LAN device.
“Off” : deactivate the wireless LAN device.
“On” : activate the wireless LAN device.
Note : the wireless LAN device have to not be use to deactivate it.
•NAT Traversal Information:
NAT traversal techniques are typically required for client-to-client networking applications, especially peer-to-peer and Voice-over-IP (VoIP) deployments. (http://en.wikipedia.org/wiki/NAT_traversal)
•Adhoc SSID Prefix:
Set the prefix name of the Ad-hoc SSID’s. The default value is set for PSP devices.
•Disc Auto-Start at System Startup:
Start the disc automatically when the system is turned on.
“Off” : deactivate the Disc Auto-Start at System Startup function.
“On” : activate the Disc Auto-Start at System Startup function.
Note : [System Settings] > [Disc Auto-Start] have to be turned on too.
•3D Video Output:
Set the video output to 3D.
“Automatic” : video output settings are automatically set.
“On” : force the 3D video output.
•Fake NP SNS Throttle:
Fake a throttling (a delay between information sends) into the social network service.
“Off (60 sec)” : the Fake NP SNS Throttle function is deactivated, the throttling is set to 60 seconds.
“On (0 sec)” : the Fake NP SNS Throttle function is activated, the throttling is set to 0 seconds.
“On (10 sec)” : the Fake NP SNS Throttle function is activated, the throttling is set to 10 seconds.
“On (120 sec)” : the Fake NP SNS Throttle function is activated, the throttling is set to 120 seconds.
“On (3600 sec)” : the Fake NP SNS Throttle function is activated, the throttling is set to 3600 seconds.
“On (Throttle Closed)” : the Fake NP SNS Throttle function is activated, the throttling is deactivated.
•Fake Plus:
Fake the activation of PlayStation® Plus.
“Off” : the Fake Plus function is deactivated.
“On” : the Fake Plus function is activated.
COBRA FUNKTIONEN
WICHTIGE INFORMATION ZUM COBRA SUPPORT
WAS IST COBRA 7.xx ?
Cobra 6.0 und niedriger war das kommerzielle Produkt CobraUSB, ein USB Dongle der zwingend benötigt wurde um die umfangreichen Funktionen von CobraUSB zu nutzen.
Nachdem das Cobra TEAM ihr ganzes Potential in den CobraODE gesteckt hatten gaben sie auf Nachfrage eines PSX-Sceners die Qullcodes für Cobra 6.0 für die PS3 Szene frei.
Einige Zeit später veröffentlichte der Hauptprogrammierer des CobraUSB Projektes in seiner Verantwortung die Quellcodes von Cobra 7.0 frei un integrierte sie in eine ROGERO 4.46.
Die Quellcodes von Cobra 7.00 waren ab da von allen Sicherheitsabfragen/Einschränkungen zum Schutz vor Reverse Engineering & unnötigen Code befreit.
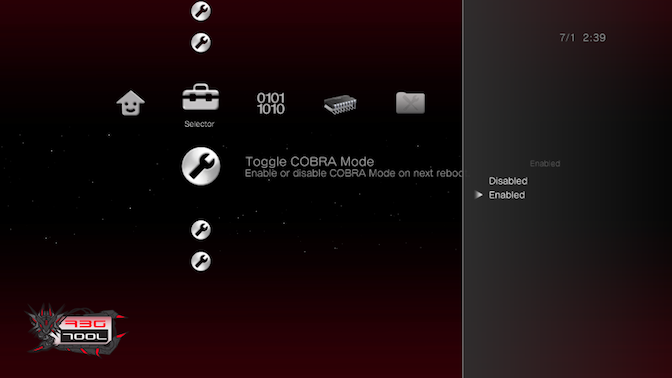
NUTZUNG DER COBRA 7.03 FUNKTIONEN
Per Voreinstellung sind die Cobra 7.03 Funktionen ausgeschaltet, doch sie können über die TOOLBOX 02.02.02 zugeschaltet werden.
INSTALLATION
1: Im XMB Package Manager auswählen
2: Install Package Files auswählen
3: PS3 System Storage auswählen
4: REBUG-TOOLBOX-02.02.02.pkg auswählen
5: Aus dem XMB Rebug Toolbox starten
6: In der 2.ten Spalte Selector die 3.te Option Toggle Cobra Mode auswählen
7: Enable anklicken, worauf das System neu bootet & die Cobra Funktionen zuschaltet
ÜBERBLICK DER COBRA 7.03 FUNKTIONEN
- PRX plugins beim Systemstart (sprx)
- ISO Unterstützung: PS1/PS2/PS3/PSP/DVD/BluRay (Split ISO Unterstützung bei FAT32 Dateisystemen)
- Netzwerk Unterstützung: PS1/PS3/DVD/BluRay /PKGs (guide)
- Blu Ray Filme (Region frei)
- NTFS HDD Unterstützung (prepNTFS, oder multiMAN benötigt um derern Inhalt zu scanen)
- PS2 ISO Unterstützung für BC (HW) / non-BC (SW) Konsolen
- Syscall 11 – Cobra lv1 Peek
*PS2 Unterstützung NUR FÜR INTERNE FESTPLATTEN !!! : dev_hdd0/PS2ISO/
GRUNDSÄTZLICHE COBRA PLUGIN INFORMATIONEN
Unterstützung von Plugins beim Booten:
Die Anzahl der möglichen VSH Plugins wurde von 1 Slot auf 7 Slots erhöht.
Slot 0 wurde für ISO Plugins (netiso.sprx and rawseciso.sprx) reserviert.
Slots 1-6 sind für Boot Plugins bereit.
VSH Plugins werden wie folgt geladen:
Die Textdatei: /dev_hdd0/boot_plugins.txt sollte eine Plugin Pfad pro Zeile enthalten
INSTALLATION VON PLUGINS
Das Plugin (Pluginname.sprx) auf die interne Festplatte (Beispiel: /dev_hdd0/) kopieren.
Eine Plugin-Textdatei (boot_plugins.txt) mit einer zugefügten Zeile für das gewünschte Plugin erstellen/editieren & in das Rootverzeichniss der PS3 kopieren.
Vorausgsetzt die Plugins werden ebenfalls in das Rootverzeichniss der PS3 kopiert (dev_hdd0/plugin_name.sprx) eine Zeile pro Plugin in der Plugin-Textdatei (boot_plugins.txt) hinzufügen.
Nach Beendigung die PS3 Konsole neu starten !!!
COBRA 7.03 PS2 FUNKTIONEN DER REBUG 4.65 REX COBRA EDITION
PlayStation 2 auf NICHT HARDWARE KOMPATIBLEN (NON-BC Consoles) Konsolen
Die Software Emulations Unterstützung für PS2 ISOs auf NICHT HARDWARE KOMPATIBLEN Konsolen wurde bei der CobraUSB 4.30 wegen de Fehlens tops2_softemu entfernt.
Durch den Hack der ps2_netemu wurde es nun wieder reaktiviert und kann wie gehabt durch das Laden der PS2.ISO und starten über das Disk-Icon im XMB gestartet werden, Cobra 7.03 übernimmt den Rest.
Das Verschlüsseln, Patchen usw, der PS2 ISO ist nicht mehr nötig, es genügt ein PS2 Disk um eine PS2.ISO zu erstellen.
Durch die ps2_netemu werden KEINE OPTISCHEN PS2 DISKS GELADEN !!!
Hinweis 1: Speichkarten müssen über das alte Memory Card-Dienstprogramm erstellt werden, da die ps2_netemud diese im Spiel nicht mehr erkennt.
Hinweis 2: Die PS2 ISO / Classic Launcher Methode sollte nur bei NICHT HARDWARE KOMPATIBLEN Konsolen angewendet werden um den Syncronisationsfehler bei kabellosen Joypads zu umgehen. Dafür ist wie immer eine RAP Aktivierung über reActPSN nötig
PLAYSTATION 2 AUF HARDWARE/SEMI HARDWARE KOMPATIBLEN (BC/SEMI BC CONSOLES) KONSOLEN
Die PS3 Modelle CECHA, CECHB, CECHC & CECHE benutzen ihre urspüngliche Methode PS2 (ps2_emu, ps2_gxemu) um PS2 Software zu emulieren.
Diese hat eine höhere Kompatibilität & bietet dazu die Unterstützung von optischen Disks (Original & Backups)
*** WICHTIGE INFORMATIONEN ZUM COBRA MODE ***
Per Voreinstellung sind COBRA MODE / webMAN bei der Installation der REBUG 4.65 REX ausgeschaltet.
COBRA MODE / webMAN können nun über die TOOLBOX 02.02.02 (siehe Bild) zugeschaltet werden.
Durch den erweiterten Cobra Payload (erneuter Dateizugriffs-Patch) könnten bei Benutzer früherer Cobra CFWs Probleme beim Starten einiger Spiele auftreten.
*** IN DIESEM FALL: Die alte Spielinstallation & ggf. die Speicherdaten erneut installieren !!!
PS2 ISO / CLASSIC LAUNCHER
(Zum Umgehen der Syncronisations-Fehlers des Joypads bei NICHT KOMPATIBLEN KONSOLEN)
Mit Cobra 7.03 können manche PS2.ISOS auf NICHT KOMPATIBLEN KONSOLEN abgespielt werden, wobei der bekannte Sycronisations Fehlers des Joypads auftritt.
Um den Syncronisations-Fehlers des Joypads zu beheben hat das REBUG TEAM diese Methode ersonnen.
Dafür sind folgende Dinge nötig:
– multiMAN um PS2 ISO zu PS2 Classic zu konvertieren, bei der PC Methode unnötig
– RAP Aktivierung für den PS2 Launcher
PS2 2P0001-PS2U10000_00-0000111122223333.zip
– PS2 Launcher oder PS2 Classic Place holder [Haben beide die gleiche Funktion]
1. Placeholder installieren & die .rap Datei für PS2 Classics über reactPSN aktivieren
2. Im multiMAN auf normal mode umschalten & .ISO anklicken
3. ISO zu PS2 Classic konvertieren [ISO.BIN.ENC]
4. Dateimanager [mmOS] benutzen , um zu sehen ob das Spiel im Pfad “/dev_hdd0/PS2ISO/<gamename>/” abgespeichert ist
5. ISO.BIN.ENC nach “/dev_hdd0/game/PS2U1000/USRDIR/” kopieren oder verschieben
6. Eine Datei namens “classic_ps2″ über den multiMAN Dateimanager [mmOS] erstellen oder im XMB/webMAN “MOD”‘ die Tasten SELECT+L2+/\ gleichzeitig drücken um PS2 CLASSIC zu aktivieren
7. Spiel über den PS2 Launcher/PS2 Classics Placeholder starten um den Joypad ordnungsgemäss zu syncronisieren. (Wichtig um die richtigen Syncronisationsadaten in die xRegistry zu schreiben)
8. Spiel beenden & über webMAN/multiMAN die PS2Classic.ISO mounten
(* Ein Backup der xRegistry über die Funktion in der TOOLBOX wird empfohlen. Falls der Syncronisationsfehler erneut auftritt kann die durch Wiederherstellung der xRegistry behoben werden)
UPDATE PACKAGE
REBUG UPDATE PACKAGE 0.2 (4.21x & 4.30.x)

***** ERMÖGLICHT WIEDER ZUGANG ZUM PSN ******
** SETZT DEN INTEGRIERTEN SPOOFER AUF FW 4.41 **
***** NUR FÜR REBUG 4.21.x UND REBUG 4.30.x *****
****** ZUGANG ZUM PSN NUR IM REBUG MODE ******
**** BENUTZUNG AUF EIGENE VERANTWORTUNG !!! ***
INSTALLATION:
Fertig, der 4.41 Spoofer ist jetzt aktiv !!!
Das Rebug Update Package kann gelöscht werden,
es wird nicht mehr benötigt.
RELEASE-THREAD AUF REBUG.ME
ZitatAlles anzeigenOriginal von cyberskunk auf Rebug.me
Rebug Update Package 0.2 – 4.21.x and 4.30.x
***** THIS ALLOWS PSN ACCESS *** USE AT YOUR OWN RISK *****
**** FOR REBUG 4.21.x AND REBUG 4.30.x ONLY ****
**** YOU MUST BE IN REBUG MODE TO ACCESS PSN ****
This will update REBUG’s version spoof files to 4.41 to and allow connection to PSN.
UPDATER WILL PERFORM THE FOLLOWING TASKS
Update the current version spoof files to 4.41 with PSN access
INSTALL
1: Install Rebug_Update_Package.pkg file from XMB
2: Run Rebug Update Package from the [Games] menu
3: Follow the on screen prompts
4: PS3 will reboot if needed when finished
NOTE: Once the PS3 has rebooted you can delete Rebug Update Package from your XMB as it is not needed.
NOTE: Please do not email us about game compatibility. Some may just require a simple PARAM.SFO edit to get past the latest game update, others may not work at all because the game NEEDS the newer files.
** Please Do Not Hotlink Our Files **
LINKS AND MD5 CHECKSUM:
Rebug_Update_Package_0.2_4.30.x.pkg – 934953ea5eb60eac3732a8ee8a9b1184
DOWNLOADS VON REBUG.ME:
Rebug Update Package 0.2 (4.30.x)
MD5: 934953ea5eb60eac3732a8ee8a9b1184
Rebug Update Package 0.2 (4.21.x)
MD5: 8a988ae38ae4969a80b3f073ec1043a2
[SUPPORT] REBUG UPDATE PACKAGE - SPOOFER 4.40:
[SUPPORT] Rebug CFW - Spoofer 4.40
Quelle: Rebug.me
IcEmAn-MODZ
VIDEO REBUG CFW XMB MOD
VIDEO REBUG CFW 4.21.1 XMB MOD 1.0
[ICE EDITION]
REBUG CFW 4.30.2 XMB MOD

- NEW – 19.03.2013 – NEW -
REBUG CFW 4.30.2 XMB MOD v02.01.00 [ICE EDITION]
-> DE Language (PAL/NTSC)
Base Installer 1.5
EXTRA:
REBUG CFW 4.30.2 XMB MOD [ICE EDITION] Extra Content
REBUG CFW 4.30.2 XMB [REX EDITION] Original XMB Installer
16 Stunden hab ich gebraucht, hier ist die angepasste XMB MOD für die neue REBUG 4.30.2 CFW !!!
Downloads @ http://www.IcEmAn-ModZ.org
REBUG REX 4.21.1 XMB MOD
REBUG CFW 4.21.1 XMB MOD [ICE EDITION]

>>> Homebrew und Install Kategorie | Media und Install Manager | Gameboot und Wave | Boot Logo und XMB Theme <<<
>>> XMB FEATURES <<< - Modded XMB Kategorien: 4.21.1 [ICE EDITION] | Bilder | HD Video | Homebrew | Games | Install
| PSN Kontakte- Install Manager ist in 7 Systemordner unterteilt: PS3 Hard Disk (Intern)
| Homebrew (Tools) | XMB BOOT PKG |PSN Content | PS1 PSN Content | PKG Patches/Updates | PKG Content
- HD Video Kategorie für TV Channel (PS3Ultimate TV) modifiziert
- app/home/PS3_GAME/ –> Launch Application (Emulation)
- Netzwerk-Einstellungen/Spieldaten-Dienstprogramm Info
- Install Kategorie für Media Manager (XMBM+) modifiziert
- Internet Browser in PlayStation Network integriert
- Homebrew Kategorie für App/Tool PKG’s
- Modded XMB-US/UK/NL-Flashfiles
- Install Manager wurde übersetzt
- Icons hinzugefügt
- REBUG Boot Info
- REBUG Slim Theme
- animiertes REBUG Boot Logo
- ULTIMATE Boot Sound
- REBUG Gameboot
>>> EXTRA FEATURES <<<
Media Manager (XMBM+) in Install Kategorie integriert
- Download Manager mit Homebrew/XMB BOOT PKG Download Channel integriert
- Homebrew-/ PS3 Game- und PS1 Game Manager hinzugefügt
- FIX/PSN Package Browser in Download Manager integriert
- Verbesserte Übersetzung
- Game Manager entfernt
XMB Manager Plus v0.71 (XMBM+) in Install Kategorie integriert
- MO3 Version angepasst (work in progress)
TV Channel (PS3Ultimate TV) in HD Video Kategorie integriert
- TV Sektion übersetzt (work in progress)
Fotos zur Ansicht (Bitte Spoiler klicken !!!)
Hallo PS3-Tools Community, mein XMB MOD 1.0 (Final) ist fertig und ich möchte ihn auch hier anbieten.
Es war sehr viel Arbeit und ich hab wie immer mein bestes gegeben. Die XMB-Veränderungen können wieder rückgängig gemacht werden.
Dank Installer hat jeder die Möglichkeit den XMB MOD individuell mit anderen Bootlogos, Designs oder Wave Lines angepasst zu nutzen.
Das ganze dient nur zur Veränderung des originalen 4.21.1 REBUG XMB. Für folgende Sprachen: DE/UK/US/NL
Anleitung: XMB MOD PKG installieren, Installer im XMB starten, MOD auswählen und installieren (bevorzugt wird ein Neustart im Hardware-Mode)
- NEW – 29.11.2012 – NEW -
REBUG CFW 4.21.1 XMB MOD v1.0 [ICE EDITION] Multi-Language PAL-DE/US/UK/NL PAL (All-in-One Installer 1.2)
REBUG CFW 4.21.1 XMB MOD v1.0 [ICE EDITION] Multi-Language PAL-DE/US/UK/NL PAL (Update 1.0)
freeCOBRA REBUG
VORWORT

VORWORT
INOFFIZIELLE freeCOBRA REBUG VERSIONEN SIND GELEAKTE ODER
GEPATCHTE REBUG VERSIONEN MIT EINGEBUNDENEN COBRA7 PATCHES.
BEI TESTS AUF VERSCHIEDEN PS3 MODELLEN GIBT ES SEHR UNTERSCHIEDLICHE
BERICHTE WAS DIE AUSFÜHRBARKEIT EINIGER COBRA7 FUNKTIONEN BETRIFFT.
IM GROBEN FUNKTIONIEREN BEI DIESEN INOFFIZIELLEN freeCOBRA
REBUG VERSIONEN DIE MEISTEN FUNKTIONEN JE NACH DEM PS3 MODELL.
ÜBER EINE ERWEITERTE TOOLBOX KÖNNEN WEBMAN & DIE COBRA7 FUNKTIONEN
ABGESCHALTET WERDEN SO MAN IM PRINZIP EINE NORMALE REBUG NUTZT.
BEI DIESEN CFW´S SOLLTE VOR DER INSTALLATION ABGEWÄGT WERDEN OB UND
WELCHE REBUG FUNKTIONEN GENUTZT WERDEN DAMIT SICH EIN UPGRADE LOHNT.
DIESE FIRMWARE SOLLTE SICHERHEITSHALBER NUR INSTALLIERT WERDEN
WENN EIN NOR/NAND HARDWARE FLASHER ZUR VERFÜGUNG STEHT !!!
PSxTOOLS.DE ÜBERNIMMT KEINE HAFTUNG FÜR SCHÄDEN & BANNS
DIE DURCH DIE INSTALLATION EINER CFW ENTSTEHEN KÖNNTEN !!!
freeCOBRA REBUG VIDEOS
REBUG 4.46.1 MIXED WITH COBRA CFW
PlayStation 3: Unofficial REBUG 4.53.1 v4+
REX/D-REX COBRA Edition Installation Tutorial HD
PlayStation 3: Unofficial REBUG 4.53.1 v4+
REX/D-REX COBRA Edition Installation Tutorial HD
RELEASE THREADS
SUPPORT THREADS
DOWNLOADS/MD5
OFFIZIELLE REBUG DOWNLOADS:
DOWLOADS BITTE MÖGLICHST ÜBER REBUG.ME !!!
<strong>REBUG_4.65.2_D-REX
http://scmods.com/rebug/firmware/REBUG_4.65.2_D-REX_PS3UPDAT.PUP</strong><strong>REBUG_4.65.2_REX
http://scmods.com/rebug/firmware/REBUG_4.65.2_REX_PS3UPDAT.PUP</strong><strong>REBUG_4.65.1_D-REX
http://scmods.com/rebug/firmware/REBUG_4.65.1_D-REX_PS3UPDAT.PUP</strong><strong>REBUG_4.65.1_REX
http://scmods.com/rebug/firmware/REBUG_4.65.1_REX_PS3UPDAT.PUP</strong><strong>REBUG_4.46.1_D-REX
http://scmods.com/rebug/firmware/REBUG_4.46.1_D-REX_PS3UPDAT.PUP</strong><strong>REBUG_4.46.1_REX
http://scmods.com/rebug/firmware/REBUG_4.46.1_REX_PS3UPDAT.PUP</strong><strong>REBUG_4.46.1_LITE
http://scmods.com/rebug/firmware/REBUG_4.46.1_LITE_PS3UPDAT.PUP</strong><strong>REBUG_4.41.3_LITE_PS3UPDAT.PUP
http://scmods.com/rebug/firmware/REBUG_4.41.3_LITE_PS3UPDAT.PUP</strong><strong>REBUG_4.41.2_LITE_PS3UPDAT.PUP
http://scmods.com/rebug/firmware/REBUG_4.41.2_LITE_PS3UPDAT.PUP</strong><strong>REBUG_4.41.1_LITE_PS3UPDAT.PUP
http://scmods.com/rebug/firmware/REBUG_4.41.1_LITE_PS3UPDAT.PUP</strong><strong>REBUG_4.30.2_D-REX_PS3UPDAT.PUP
http://scmods.com/rebug/firmware/REBUG_4.30.2_D-REX_PS3UPDAT.PUP</strong><strong>REBUG_4.30.2_REX_PS3UPDAT.PUP
http://scmods.com/rebug/firmware/REBUG_4.30.2_REX_PS3UPDAT.PUP</strong><strong>REBUG_4.21.2_REX_PS3UPDAT.PUP
http://scmods.com/rebug/firmware/REBUG_4.21.2_REX_PS3UPDAT.PUP</strong><strong>REBUG_3.55.4_REX_PS3UPDAT.PUP
http://scmods.com/rebug/firmware/REBUG_3.55.4_REX_PS3UPDAT.PUP</strong><strong>REBUG_3.55.4_999_DGR_PS3UPDAT.PUP
http://scmods.com/rebug/firmware/REBUG_3.55.4_999_DGR_PS3UPDAT.PUP</strong><strong>Rebug_Update_Package_0.2_4.30.x.pkg
http://scmods.com/rebug/pkg/Rebug_Update_Package_0.2_4.30.x.pkg</strong><strong>Rebug_Update_Package_0.2_4.21.x.pkg
http://scmods.com/rebug/pkg/Rebug_Update_Package_0.2_4.21.x.pkg</strong>
NUR FÜR ABSOLUTE NOTFÄLLE (FALLS REBUG.ME MAL OFFLINE IST)
MD5 CHECKSUMS:
REBUG_4.65.2_D-REX_PS3UPDAT.PUP
46e531ff271e02d137cc960100a1006e
REBUG_4.65.2_REX_PS3UPDAT.PUP
c18eecd7e91320e759432f21d07b1f4c
REBUG_4.65.1_D-REX_PS3UPDAT.PUP
1e3bf35fcfec29ab8528e2d6d4ec680e
REBUG_4.65.1_REX_PS3UPDAT.PUP
24edec72160f35b387843d53fc17df2f
REBUG_4.46.1_D-REX_PS3UPDAT.PUP
7f4c5ed81570dc2a37a3697b076435de
REBUG_4.46.1_REX_PS3UPDAT.PUP
8acb7b9cb5129bb95c4a35d31978edb8
REBUG_4.46.1_LITE_PS3UPDAT.PUP
95279e192fc4e326f48c5817e81bb9e3
REBUG_4.41.3_D-REX_PS3UPDAT.PUP
e65147b3fc347647b4201ae5d57f9035
REBUG_4.41.3_REX_PS3UPDAT.PUP
13c34dcc07d8e9e4f8416bb9aa478adf
REBUG_4.41.3_LITE_PS3UPDAT.PUP
cc73eaf7a6a65673291aa96ee467785f
REBUG_4.41.2_LITE_PS3UPDAT.PUP
c974aaf02e14ac002cbb9a0d80a40890
REBUG_4.41.1_LITE_PS3UPDAT.PUP
26db0c444ebf09c9ad58790d57d7a700
REBUG_4.30.2_D-REX_PS3UPDAT.PUP
43a716b43dd6e920323ed4815c780ef3
REBUG_4.30.2_REX_PS3UPDAT.PUP
abc9e91a4dcc79874f6ac783723e4a9d
REBUG_4.30.1_CEX_PS3UPDAT.PUP
88866cd069da39053c6a1694ecaabc32
REBUG_4.21.2_REX_PS3UPDAT.PUP
41e43ff7d0286b2f318ca6f56227a492
REBUG_3.55.3_REX_PS3UPDAT.PUP
cba78abda0fd260335f43b7112cba398
REBUG_3.55.3_999_DGR_PS3UPDAT.PUP
b5cb68c298e26c278bdb08c8e3b6d9be
freeCOBRA REBUG DOWNLOADS:
INOFFIZIELLE freeCOBRA
REBUG 4.53.4+ REX by @Joonie86
MD5: b318413836233174e48a4ba32e96e652
INOFFIZIELLE freeCOBRA
REBUG 4.53.4 D-REX+ by @Joonie86
MD5: 707f987b5aa50765fc4e03a340da1441
INOFFIZIELLE freeCOBRA
REBUG 4.53.3 REX by @Joonie86
MD5: ec1a09e122795d8c01c82839122e6e72
<strong>http://www.mediafire.com/download/0o798gmzca4nfye/REBUG_4.53.3U_REX_COBRA_BY_Joonie.PUP</strong>
ALT. INOFFIZIELLE freeCOBRA
REBUG 4.53.3 REX by @Joonie86
MD5: ec1a09e122795d8c01c82839122e6e72
<strong>http://www.file-upload.net/download-9336489/REBUG_4.53.3U_REX_COBRA_BY_Joonie.PUP.zip.html</strong>
INOFFIZIELLE freeCOBRA
REBUG 4.53.2 REX by @Joonie86
MD5: 7061b0b15598350f4ba712b14a398c7b
<strong>http://www.mediafire.com/download/7h4c4hd51gp58kv/REBUG_4.53.2U_REX_COBRA_BY_Joon</strong>
INOFFIZIELLE freeCOBRA
REBUG 4.53.2 REX by @Joonie86
MD5: 7061b0b15598350f4ba712b14a398c7b
<strong>http://www.file-upload.net/download-9326007/REBUG_4.53.2U_REX_COBRA_BY_Joonie.PUP.html</strong>
INOFFIZIELLE freeCOBRA
REBUG 4.53.1 REX
MD5: c96b05146b22b8fbd4b1d89b82862b03
<strong>http://www.mediafire.com/download/0g9iieflas7wv7p/PS3UPDAT_REBUG_453_COBRA.PUP</strong>
DOWNLOAD INOFFIZIELLE
freeCOBRA - REBUG 4.53.1 REX
MD5: c96b05146b22b8fbd4b1d89b82862b03
<strong>http://www.file-upload.net/download-9313407/PS3UPDAT_REBUG_453_COBRA.PUP.zip.html</strong>
INOFFIZIELLE freeCOBRA -
REBUG REX 4.46 CFW v.2
MD5: fdc5692a414ff27bb77614391d4e6635
INOFFIZIELLE freeCOBRA
REBUG REX 4.46 CFW v.2
MD5: fdc5692a414ff27bb77614391d4e6635
<strong>http://www.file-upload.net/download-9319131/REBUG_4.46.2_REX_COBRA_PS3UPDAT.PUP.zip.html</strong>
INOFFIZIELLE freeCOBRA
REBUG REX 4.46 CFW v.3 Test Version
<strong>http://www.file-upload.net/download-9398293/INOFFIZIELLE.freeCOBRA.-.REBUG.REX.4.46.v.3.TestVersion.rar.html</strong>
ALT. INOFFIZIELLE freeCOBRA
REBUG REX 4.46 CFW v.3 Test Version
INOFFIZIELLE freeCOBRA
REBUG REX 4.46.3 (PSP-Support Fixed !!!)
MD5: e16f2dca53d6bbe3e0e5cc56974db87e
<strong>http://www.file-upload.net/download-9350731/REBUG_4.46.1_REX_COBRA_PS3UPDAT.zip.html</strong>
INOFFIZIELLE freeCOBRA
REBUG REX 4.21.2
MD5: f1d47d9ead0237fb3e6194b9b77f643f
<strong>http://www.file-upload.net/download-9460723/REBUG_4.21.2_REX_COBRA_PS3UPDAT.zip.html</strong>
UP + DOWNGRADES
BRICKSICHERER UP & DOWNGRADE TIP !!!
ALLE OFFIZIELLEN & INOFFIZIELLEN freeCOBRA REBUG VERSIONEN
SIND UNTEREINANDER ÜBER DAS XMB UP UND DOWNGRADEBAR !!!
DIE JEWEILIGEN REBUG VERSIONEN KÖNNEN DABEI VON USB, VON
DISK ODER NACH DIESER METHODE VON HDD GELADEN WERDEN.
RELEASE THREAD
UPDATE NEWS AUF REBUG.ME
Official – Rebug 4.65.2 – Cobra 7.03 – Toolbox 2.02.02 – Jan. 2015
LATEST REBUG FIRMWARE BUILDS
D-REX Cobra 7.03 EDITION – INSTALL ON DEX PS3 SYSTEM
REBUG 4.65.2 D-REX EDITION – JAN. 13TH 2015
(See below for full D-REX EDITION features)
REX Cobra 7.03 EDITION – INSTALL ON CEX PS3 SYSTEM
REBUG 4.65.2 REX EDITION – JAN. 13TH 2015
(See below for full REX EDITION features)
FEATURES FOR REBUG REX/D-REX EDITION
FEATURE – Dual LV2 Kernels CEX/DEX
(Swap your EID0/LV2 kernel using Rebug Toolbox in seconds)
FEATURE – ALL Retail functions available in CEX mode
(No need to install different firmware)
FEATURE – ALL Debug functions available in DEX mode
(No need to install different firmware)
FEATURE – ProDG Connectivity in DEX mode
(Full Support on Normal mode, Partial Support on Cobra mode)
FEATURE – QA Token compatibility
FEATURE – OtherOS++ support enabled
(Use Rebug Toolbox to Boot OtherOS with different LV1 patches)
FEATURE – Package Manager
(Replacement for the standard ‘Install Package Files’ option)
INCLUDED – Rebug Toolbox 02.02.02
(Install included Rebug Toolbox or higher for full compatibility)
PATCHED – LV1: Disable System Integrity Check
(Safe to use with mismatched COREOS/SYSCON versions or if PS3 is not QA enabled)
PATCHED – LV1: Undocumented function 114
(Allow mapping of protected memory)
PATCHED – LV1: Skip all ACL Checks
(Needed to allow booting of OtherOS)
PATCHED – LV1: Peek and Poke support
(Unused LV1 call 182 and 183)
PATCHED - LV2: Peek and Poke support
(LV2 Syscall 6 and 7)
PATCHED - LV2: Peek and Poke support for LV1
(LV2 Syscall 8 and 9)
PATCHED - LV2: LV1 CALL System call
(LV2 Syscall 10)
PATCHED - VSH: Allow Unsigned act.dat and *.rif files
PATCHED - VSH: Disable Unlinking/Deleting of act.dat
FUN FEATURE – Fake Save Data Owner
(Use Game Saves from ANY Owner)
FUN FEATURE – Enhanced Remote Play with PC
(This unlocks the limitation of working apps/games for remote play with PC )
FUN FEATURE – Lock/Unlock Trophies
FEATURE – RSOD Bypass for Installation Only
(This does not fix the issue itself, but This will allow PS3 to boot fine)
FUN FEATURE – Cinavia protection fully disabled
(Supports optical media/bd iso, AACS must be decrypted)
FEATURE – Cobra 7.03
(Disabled by default, Toolbox required to enable)
FEATURE – 1.41.05 MOD REBUG EDITION
(Full Webman intergration supports both CEX/DEX 4.65)
FEATURE – 4.66 Version Spoofer
(REBUG Mode on TOOLBOX is required for PSN /SEN Access, until next OFW update)
PACKAGE MANAGER
Package Manager is a replacement for the standard Install Package Files option under Game in the XMB. It allows for the install and deletion of .pkg files from dev_hdd0/packages, dev_usb/packages and the standard Install Package Files locations. In addition to this, your downloaded PSN content ‘bubbles’ will appear under this option instead of cluttering your Game menu with uninstalled content.
USAGE:
Navigate to Game in your XMB and click on Package Manager (It will be where Install Package Files usually is). You will find three options.
PlayStation®Network Content
Manage your downloaded PlayStation®Network Content.
Install Package Files
INSTALL package files from Storage Devices and your PS3.
PS3 Hard Disk (dev_hdd0/packages)
Package Folder (dev_usb/packages)
Standard Package Location (Standard Install Package Files locations)
NOTE: The Install All Packages is only available by pressing the TRIANGLE button when the Standard Package Location option is highlighted because the PS3 will only install ALL packages from the root of a storage device as of the moment.
Delete Package Files
DELETE package files from Storage Devices and your PS3.
PS3 Hard Disk (dev_hdd0/packages)
Package Folder (dev_usb/packages)
Standard Package Location (Standard Install Package Files locations)
DELETING FILES:
1: Highlight the file you would like to delete and press TRIANGLE. The sidebar should appear.
2: Press CROSS on either Unlink or Unlink(Folder) (Both do the same thing for now).
REBUG TOOLBOX
Rebug Toolbox is application designed to complete the full function of REBUG REX EDITION firmwares. Besides from performing the CEX/DEX EID0 and LV2 Kernel Swapping it is also an FTP server and is packed with a bunch of other useful tools.
INSTALL:
1: In the PS3 XMB go to Game menu
2: Select Package Manager
3: Select Install Package Files
4: Select PS3 Hard Disk
5: Select REBUG-TOOLBOX-02.xx.xx.pkg
Cobra 7.03
What is Cobra 7.XX?
Cobra 6.0 and lower was CobraUSB and needed a USB dongle to use its unique features,. This was the first product by the Cobra Team who is now behind the CobraODE. After the Cobra Team launched the first ODE device, Community News Writer STLcardsWS inquired about the future of the CobraUSB device as it seemed to be shelved (unofficially at the time). STLcardsWS according to the Cobra Team Representative Magneto asked if the device could be made open source for the community, since the team had all but moved onto ODE products. That is when Team Cobra gave in and threw a bone to the PS3 Homebrew Community. Shortly, after that time is when we seen the first official source code release of CobraUSB (link of this story). While this proved to be a huge advancement in the PS3 development community it however was a rough release as it contained all the USB security source code also. While developer’s like u$er was able to use parts and makes sense of some of the functions (which helped create PRX Loader, the first plugin system for the PS3)., most developer struggled with the source as it had alot of unnecessary parts included to protect the USB device when the Cobra Devs wanted to keep this system closed sourced. .
Several weeks later, the Lead CobraUSB developer (who was not aware of the first release when it happened) released the first Dongle-Less Cobra CFW using Rogero’s 4.46 CFW as a base. The developer also updated Cobra 6.0 to Cobra 7.0 with new features and cleaned the source removing all the security garbage (link to this story). Thus making it a complete release with full instructions and details for scene developers. Since that time we have seen its evolve and added to many CFW’s. Below you can view some of the features that are built into Cobra System with some additional explanations.
How to Enable Cobra Features:
By default Cobra 7.03 is disabled, to enable the Cobra Features simply access the REBUG Toolbox.
INSTALL:
1: On the XMB select Package Manager
2: Select Install Package Files
3: Select PS3 System Storage
4: Select REBUG-TOOLBOX-02.02.02.pkg
5: Access Rebug Toolbox from XMB
6: Scroll to 2nd column Selector, and select 3rd option Toggle Cobra Mode
7: Select Enable, and system will reboot with Cobra now enabled on the CFW.
Toggle_Cobra
Cobra 7.03 Overview
PRX plugins at boot time (sprx)
ISO Suppport: PS1/PS2/PS3/PSP/DVD/BluRay (Split ISO support on FAT32 drives)
Network Support: PS1/PS3/DVD/BluRay /PKGs (guide)
Blu Ray Movie region free functionality
NTFS HDD Support (prepNTFS, or multiMAN Required to scan contents)
PS2 ISO Support for BC (HW) / non-BC (SW) Consoles
Syscall 11 – Cobra lv1 Peek
*PS2 Support on Internal HDD ONLY: dev_hdd0/PS2ISO/
General Cobra Plugin Information
Support for plugins at boot time:
The number of vsh plugins has been increased from 1 to 7 slots.
Slot 0 is reserved for use for iso plugins (netiso.sprx and rawseciso.sprx).
Slots 1-6 are for boot plugins.
Plugins are loaded in the following way:
text file: /dev_hdd0/boot_plugins.txt shall contain a plugin path per line.
How to Install a Plugin:
Copy plugin_name.sprx to you internal ps3 hdd (ex: /dev_hdd0/).
Create or Edit boot_plugins.txt in the root of the hdd (/dev_hd00/boot_plugins.txt) and add a line for the new plugin. Assuming you placed the sprx also in the root of the disk, add: /dev_hdd0/plugin_name.sprx). Add a new line for each plugin.
Then Reboot PS3 Console!
Cobra 7.03 PS2 Features (4.65 Cobra)
PlayStation 2 on NON-BC Consoles
Software (SW) Emulation:Support for PS2 ISOs in non BC consoles was removed in Cobra 4.30 (usb), due tops2_softemu missing. It has been re-enabled now by hacking of ps2_netemu. You can use it in the same way as before, just load an ISO and launch from disc icon, Cobra core takes care of rest. No need for encrypted isos, isos patched with limg sectors, etc. Just your normal PS2 isos dumped from discs. However, there is no support for optical discs in ps2_netemu.Note 1: Don’t forget to set the memory cards in XMB, in the old memory card utility for PS/PS2, as ps2_netemu won’t let you assign them in game.Note 2: Please use PS2 ISO / Classic Launcher (non-BC only for wireless sync issue) method to fix the issue with wireless pad sync issue. RAP activation via reactPSN is required
PlayStation 2 on BC Consoles
Hardware (HW) Emulation:
PS3 Models: CECHA, CECHB, CECHC and CECHE Backwards Compatible (BC) Consoles will still use their respetive emulators(ps2_emu, ps2_gxemu), which have much better compatibility and also support optical discs, original or backup.
**IMPORTANT INFORMATION**
COBRA MODE
COBRA mode / webMAN currently disabled by default, if you want to use Cobra 7.03 features, please enable Cobra mode via REBUG TOOLBOX 2.02.02. Previous Cobra CFW users may experience issues with some games due to improved cobra payload that has updated permission patch, in this case. ***Remove old game data and re-install the game, possibly save game data as well if you run into weird issues. Previous Cobra payload still had its old patches that were used for USB Dongle and mmCM, but not anymore, and this fixes the issue with all non-working games with Cobra. non-Cobra users will not have this problem since their data were not corrupted by old cobra payload.
PS2 ISO / Classic Launcher
(non-BC only for wireless sync issue)
With Cobra core, You can play PS2 ISO rips on NON-Backward compatible PS3, however, there has been an annoying wireless sync issue while playing ps2 games, so we designed this work around to fix the issue with wireless pad sync by following method.
Couple things are required
– multiMAN for PS2 ISO to Classic conversion, not needed if you use PC method
– RAP activation for PS2 Launcher, [Link available for download on the bottom]
PS2 2P0001-PS2U10000_00-0000111122223333.zip
– PS2 Launcher or PS2 Classic Place holder [they both do the same function]
1.Install placeholder and activate the rap file for classic via reactPSN
2. Go to multiman normal mode and click on iso
3. Convert ISO to Classic [ISO.BIN.ENC]
4. Use mm filemanager [mmOS] , look for this path “/dev_hdd0/PS2ISO/<gamename>/”
5. Copy or Move ISO.BIN.ENC to “/dev_hdd0/game/PS2U1000/USRDIR/”
6. Create a flag file named “classic_ps2″ via mmOS [file manager from multiMAN] or, go to XMB and use webMAN “MOD”‘s toggle; press SELECT+L2+/\
7. Run the game from npdrm legit/placeholder(depending on the option you chose) and maintain one stable sync, this is important to write proper sync data in registry.
8. You can safely close the game, and start mounting PS2 ISO via webMAN
(*Back up registry via TOOLBOX is recommended in case of potential sync issue problem occurs, if the sync issue happens in the future, you can restore your sync data via registry restoration)
QA SUPPORT
QA is supported in all REBUG FIRMWARE. It is good practice to enable QA for a smoother experience on any CFW not just REBUG.
OTHEROS++ SUPPORT
OtherOS++ is supported by all REBUG REX EDITIONS and will detect your existing OtherOS HDD partition.
However none of the REBUG REX EDITIONS have emer_init.self patched (create smaller GameOS partition). We are working on a solution to this from GameOS.
In the meantime if you do want to create an OtherOS partition you have two options:
1: Use a 3.55 firmware that already has emer_init.self patched to the size you want.
2: Patch REBUG 3.55.x REX EDITION in PS3MFW Builder
If you choose option 2 we highly recommend that you ONLY patch emer_init.self. Also the resulting PUP will only be able to be installed on 3.55 firmware as the spkg_hdr will be mismatched.
HOW TO Install & Uninstall REBUG
INSTALL:
From XMB install REBUG 4.21.x AND HIGHER over any 3.55 OFW/CFW/MFW or the same or lower firmware version CFW with spkg sig check patched or any firmware version CFW with spkg sig check patched and QA enabled.
UNINSTALL:
From XMB REBUG 4.21.x AND HIGHER can be uninstalled with the same or higher firmware version OFW/CFW/MFW or with REBUG 3.55.x REX EDITION on a QA enabled PS3 or with the ‘999’ DOWNGRADER if QA was NOT enabled.
Known Bug(s)
*PS2 Pad Sync is currently fixed with PS2 Launcher work around, however small amount of users may have sync issues,
in this case, Please use toggle ps2 emulation via Standalone Rebug toolbox pkg with original PS2 emulator files.
Download available via link below [REBUG TOOLBOX 2.02.02_PS2]
In this case, PS2 ISO compatibility is disabled, due to usage of the original PS2 emu files without Cobra payload.
*TMAPI is supported on both Cobra / non-Cobra mode, however, ProDG is not fully functional while on Cobra mode,
Game modding is supported while on Cobra mode, but for debugging purpose, disabling Cobra is recommended for stability.
Enjoy
~Codename: REBUG Team.
Codename: REBUG New Team Members:
** Joonie ** ** Habib ** ** Abkarino **- Without them this version of Rebug would never exist. These are some very talented developers so please show them the same respect you have shown us over the years.
Codename: REBUG would like to thank:
graf_chokolo (as always) and The Three Musketeers for the work they have done in the past and (hopefully) future.
Big thanks to:
naehrwert - For scetool (its elf compression played a big part in 4.21.1)
deank - Helping us get the Rebug Toolbox up and running, and Webman
aldostools m@tsumot0, haxxxen – Webman MOD 1.41.05
Kw – Cobra payload coding, EvilNAT- help with LV1/LV2 reversing
Our BIGGEST thanks:
flatz - Helping with the OtherOS testing and well… You know what you did.. ![]()
Rebug Scorpion Artwork:
by blastleaf - blastleaf@gmail.com
Rebug Customised Font:
by @GDcooya
LINKS AND MD5 CHECKSUM: LINKS AS OF 01/13/2015
** Please Do Not Hotlink Or Mirror Our Files **
This includes posting links of our links, we rely on visitors to our site to help offset server costs.
REBUG_4.65.2_D-REX_PS3UPDAT.PUP
46e531ff271e02d137cc960100a1006e
REBUG_4.65.2_REX_PS3UPDAT.PUP
c18eecd7e91320e759432f21d07b1f4c
REBUG_TOOLBOX_02.02.02
1576ec41fda37c9d44a05ae0c29a319d
REBUG_TOOLBOX_02.02.02_PS2
b75a17cb29ecbc38a6c873f05da8e9ff
Ps2 Launcher Rebug Edition
b46c5bd7e7f5cf58c069a318d3159056
PS2
0ca07f0aca7d76bf75c60f82d328372a
REBUG_4.65.1_D-REX_PS3UPDAT.PUP
1e3bf35fcfec29ab8528e2d6d4ec680e
REBUG_4.65.1_REX_PS3UPDAT.PUP
24edec72160f35b387843d53fc17df2f
REBUG_4.46.1_D-REX_PS3UPDAT.PUP
7f4c5ed81570dc2a37a3697b076435de
REBUG_4.46.1_REX_PS3UPDAT.PUP
8acb7b9cb5129bb95c4a35d31978edb8
REBUG_4.46.1_LITE_PS3UPDAT.PUP
95279e192fc4e326f48c5817e81bb9e3
REBUG_4.41.3_D-REX_PS3UPDAT.PUP
e65147b3fc347647b4201ae5d57f9035
REBUG_4.41.3_REX_PS3UPDAT.PUP
13c34dcc07d8e9e4f8416bb9aa478adf
REBUG_4.41.3_LITE_PS3UPDAT.PUP
cc73eaf7a6a65673291aa96ee467785f
REBUG_4.41.2_LITE_PS3UPDAT.PUP
c974aaf02e14ac002cbb9a0d80a40890
REBUG_4.41.1_LITE_PS3UPDAT.PUP
26db0c444ebf09c9ad58790d57d7a700
REBUG_4.30.2_D-REX_PS3UPDAT.PUP
43a716b43dd6e920323ed4815c780ef3
REBUG_4.30.2_REX_PS3UPDAT.PUP
abc9e91a4dcc79874f6ac783723e4a9d
REBUG_4.30.1_CEX_PS3UPDAT.PUP
88866cd069da39053c6a1694ecaabc32
REBUG_4.21.2_REX_PS3UPDAT.PUP
41e43ff7d0286b2f318ca6f56227a492
REBUG_3.55.3_REX_PS3UPDAT.PUP
cba78abda0fd260335f43b7112cba398
REBUG_3.55.3_999_DGR_PS3UPDAT.PUP
b5cb68c298e26c278bdb08c8e3b6d9be
SUPPORT THEMEN
PSxTOOLS REBUG NEWs
Wie angekündigt wurde jetzt vom neuen TEAM REBUG
die REBUG 4.65.2 REX / D-REX Cobra 7.0.3
mit neuer TOOLBOX v02.02.02 veröffenlicht.
Features:
der PS2 Menü Bug bei CECH-A bis CECH-F wurde gefixt
CECH-A bis CECH-F können PS2 ISOs mit Rebug 4.65.2 ganz normal über das Disk Icon starten.
für NOR PS3s ab CECH-G gibt es einen PS2Launcher für PS2 ISOs, um ohne USB Kabel spielen zu können
Ein neues payload wurde eingebaut damit Cobra noch stabiler wird
die stage2 wurde mit in die CFW eingebunden welches Cobra mehr kompatibilität bringt
Auch ein 4.66 Spoofer für die Rebug 4.65.2 wurde mit eingebaut (Rebug Mode - CEX / DEX)
webMAN Mod v1.41.05 Rebug Edition ist mit eingebaut
der PS1 Video pal->ntsc Bug wurde gefixt
Zudem wurden alle Fehler der 4.65.1 beseitigt
Die toolbox Kompatibilität wurde für 4.46 bis 4.65 verbessert
den Eid root key kann man bei 4.46 bis 4.65 dumpen, dieser wird automatisch in den toolbox Ordner auf Intern kopiert
und lann Versionsunabhängig von 4.46 bis 4.65 verwendet werden
Zudem kann man jetzt ganz schnell und einfach von CEX zu DEX wechseln.
der PS4 Controller funktioniert weiterhin kabellos im PS3Menü und in PS3 Games, bei PSP, PS1 und PS2 Games per USB Kabel
eine genauere Beschreibung der Features findet ihr bei http://www.rebug.me
Installation:
die Rebug 4.65.2 kann auf jeder PS3 installiert werden bei der ToggleQA/QAFlag oder eine Rebug CFW installiert ist
die cobra & webMAN toggler sind nach Install der CFW zuerst einmal deaktiviert.
Um diese nutzen zu können muss die toolbox v02.02.02 die sich schon als PKG auf der internen HDD befindet installiert werden
und unter selector der cobra toggler (CEX / DEX) aktiviert werden.
webMAN aktiviert sich dabei automatisch, kann aber jeder Zeit wieder deaktiviert werden.
Stellt man in der toolbox unter selector den VFW Mode von "normal" auf "Rebug" wird ein 4.66 Spoof aktiviert (CEX / DEX)
Es darf sich beim Updaten/Downgraden KEINE Disk im Laufwerk befinden
Ihr seit auf einer CFW und wollt auf die Rebug 4.65.2 updaten...
Rebug 4.65.2 kann auf jeder PS3 installiert werden bei der ToggleQA/QAFlag oder eine Rebug CFW installiert ist
CFW Updates sollte man nur mit gesetzter QAFlag / aktiviertem ToggleQA ausführen (Brickschutz)
Überprüft zuerst ob QAFlag nicht schon intalliert ist.
ToggleQA installieren und ausführen
die QA-Flag / Toggle QA Tastencombo für die Debug Settings eingeben:![]() +
+ ![]() +
+ ![]() +
+ ![]() +
+ ![]() +
+ ![]() gleichzeitig drücken.
gleichzeitig drücken.
Bei Rebug CFWs muss in der toolbox auf Debug Mode umgestellt werden.
Wurden die Debug Settings erfolgreich aktiviert sind nun zusätzliche Menüpunkte
Edy Viewer, Debug Settings & “Install Package” auswählbar.
Hier stellt ihr jetzt in den Debug Settings den Menüpunkt "System Update Debug" auf "On"
INFO:
ToggleQA setzt sich ins PS3 EEPROM & muss nur 1x Installiert werden. Danach ist es so lange Installiert bis das Tool ein zweites mal ausgeführt und dadurch deinstalliert wird.
Die qa Flag 4.xx.pkg auf einen USB Stick kopieren, im XMB unter "Install Package Files" installieren & ausführen.
Habib QAFlag lässt sich auf jeder CFW ab 4.21 installieren
Wenn ToggleQA installiert wurde (PS3 ca. 20 Sekunden im Blackscreen) und ihr wieder im PS3 Menü seit, geht ihr mit dem PS3 Cursor zu “NetworkSetting“.
Jetzt könnt ihr mit der Rebug 4.65.2 ganz normal im PS3 Menü updaten.
die CFW (PS3UPDAT.PUP) kommt immer auf einen USB Stick in die Ordner "PS3/UPDATE/PS3UPDAT.PUP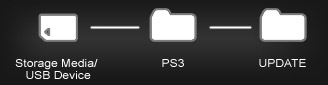
CEX to DEX:
ohne PC und/oder USB Medien ganz schnell und einfach von CEX zu DEX wechseln
und zwar geht das mit jeder Rebug Rex CFW ab 4.46, auch mit inoffizellen REX und REX Cobra Versionen.
Einfach über die toolbox einmalig den eid root key auf die interne HDD dumpen lassen (geht nur unter CEX)
und danach direkt in der toolbox von CEX zu DEX und wieder zu CEX switchen
Info zur PS2 ISO kompatibilität:
bei BC und semi-BC PS3s - CECH-A bis CECH-F starten PS2 ISOs ganz normal über das Disk Icon
das Menü beim drücken der "PS" Taste funktioniert wieder normal
PS2 classics kann man optional über den Rebug PS2Launcher starten
non-BC PS3s, also alle PS3s ab CECH-G müssen den Rebug PS2Launcher ( PS2 Emu Original Mode) nutzen, damit der Controller ohne USB Kabel verwendet werden kann.
[RELEASE] REBUG PS2 ISO & classics Launcher
Wird eine PS2 ISO über das Disk Icon (Cobra PS2 Emu Mode) gestartet, muss der Controller per USB verbunden werden.
Info zur stage2:
stage2 verändert einige Zugriffsrechte, verbessert aber dadurch auch die Cobra Funktionen
sollten Spiele nicht starten, einfach die alten Spielenstallationsdaten löschen.(nicht das Spiel)
Danach läuft das Spiel wieder ganz normal
Wie immer ist die REBUG REX für alle normalen PS3s die man im Laden kauft
und die REBUG D-Rex für Debug/Test PS3 Konsolen.
den Download und genaue Infos findet ihr bei der Quelle.
~Codename: REBUG Team
** Please Do Not Hotlink Or Mirror Our Files **
Quelle, LATEST REBUG FIRMWARE BUILDS: http://www.Rebug.me
PS:
Hier noch der Cobra PSPLauncher
Hier geht es zum [SUPPORT] REBUG CFW Edition`s
by joonie
Zitat
DANKSAGUNGEN
TEAM REBUG BEDANKT SICH BEI:
graf_chokolo (as always) and The Three Musketeers for the work they have done in the past and (hopefully) future.
Big thanks to:
naehrwert - For scetool (its elf compression played a big part in 4.21.1)
deank - Helping us get the Rebug Toolbox up and running.
Our BIGGEST thanks:
flatz - Helping with the OtherOS testing and well… You know what you did..
Rebug Scorpion Artwork:
by blastleaf - blastleaf@gmail.com
Rebug Customised Font:
by @GDcooya
DOWNLOAD FROM - Codename: REBUG
Enjoy
~Codename: REBUG Team.

Copyright by psXtools.de (Kopieren, bitte nur mit korrekter Quellenangabe !!!)